CHOOSING AND USING THREAD
Produced by Michael Pattinson
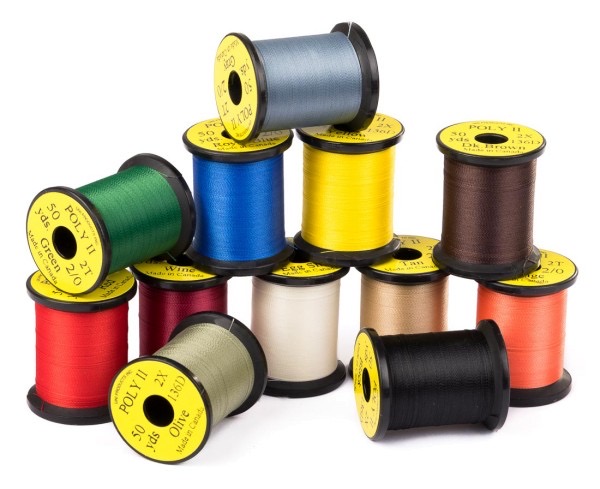
It would be easy to assume that all thread is the same except for colour, but with a little thought you will quickly realise there are in fact many different types of thread material and thickness.
There are very few flies that can be made without using thread, so the process of choosing and using thread is central to the fly-tying process.
If you go to a fly-tying shop or online store the array of different threads on offer is vast, growing and continuously changing so how are you going to choose which ones to buy?
Tips
- The fact of the matter is that you do not need most of them!
- The threads you do need are dependent on the type of flies you want to tie
- Most of the time thread colour is not critical to catching fish
- You can if you wish, change the colour of a pale thread with permanent felt tip pens
- You will only use small quantities of thread so one spool of each type is fine
- I have in the past bought a complete set of colours of one particular make of thread. Resist the temptation to buy spools in this way because although they may represent good value for money per spool the probability is that you will not use some colours and you will run out of others. Fly-tyers tend to have boxes and boxes of threads they have never used
- To a large extent the size of the hook determines the thickness of the thread that must be used
This last point needs clarification.
Hooks range in size from 2 or 3 mm long to several centimetres. If you were tying a very small fly to represent something like a midge or greenfly it would be impossible to complete the fly if you used a very thick thread. The turns of thread would look completely out of proportion on the shank of the hook and it would be impossible to attach other materials in a neat and tidy way. A thin thread would be essential.
The converse is not true however. If you are tying on a large salmon hook which is several centimetres long you might think logically that a very thick thread might be best, but in reality you will find that this is not true. Big flies are best tied with ‘normal’ thickness threads. You can, if you wish, use very thin threads to tie big flies but it will require many more turns of thread.
Thread Material
Thread not only comes in different colours and thicknesses but also in different types of material used in their construction and they all have different properties. Some are very strong and some are very weak, some are composed of single strands and some are multi stranded. Some are waxed and some are not. Some are round and some are flat. Some are fluorescent and some are not.
- Polyester - Is a man-made fibre which is generally stronger than nylon. A commonly available type called UNI-THREAD is polyester
- Nylon - Separates easily into individual fibres and stretches more than polyester but is not as strong as polyester
- Kevlar - Is incredibly strong and care has to be taken whilst using it. For example one may get into the habit of snapping threads by hand but Kevlar will not snap and may slice through flesh if handled carelessly. Kevlar is rarely used in fly tying
- Gel Spun Polyethylene - GSP is available in more colours and in thinner strands than Kevlar whilst retaining the same degree of strength. It is very good for tying deer hair patterns
- Silk - Silk thread ( made by Pearsalls but now generally unavailable ) is still used to tie the classic North Country Spider patterns and a number of other classic patterns but it is not as strong as the synthetics and decays over time both on the spool and in the fly. It should be kept in the dark to prevent UV light getting at it. It can still be found on sale and there are substitutes available. Traditionalists like to use the genuine Pearsalls but the choice of colour is not always straight forward
Using Threads
It is sometimes a good idea to make a “whip finish” or half hitch at crucial stages of the construction of a fly in order to secure the thread in case it breaks
Breaking a thread whilst tying a fly is not unusual. One has to get familiar with the breaking strain of different threads and this takes time and practice
Cutting a thread accidentally with scissors whilst tying a fly or catching a thread on the hook point is also common - and very irritating!
Most of these situations can be rescued and do not mean that the fly is ruined. It is usually possible to just re-attach the thread and carry on
Useful Tips
Bobbins (spools of thread) must be held on bobbin holders. Bobbin holders (together with their bobbin) are usually referred to as bobbins just to confuse you
Several bobbin holders are better than one. You do not need to stop so often and rethread when changing thread colour
The frequency of snapping the thread may be inversely proportional to the cost of the bobbin holder!!
This is not always true but the tension on the legs of a bobbin holder has to be adjusted so that :-
- There is resistance when one pulls thread off the spool
- The resistance is not so great that the thread breaks when it is pulled from the bobbin
- The thread must flow reasonably easily off the spool as turns are applied to the hook
- When hanging free the weight of the spool and the bobbin holder must not cause the spool to unwind by itself
- While tying a fly keep the turns of thread are kept close to each other
Some bobbin holders have a mechanical way to make this critical adjustment and others rely on “bend and guess techniques”. A good bobbin holder is a joy to use. Bad ones are a nightmare
Some flies call for the use of FLOSS. Floss is multi-stranded and quite bulky. It is difficult to handle, particularly with “snaggy hands” caused by physical abrasion of the skin or too much washing up (woops, ignore that last remark). The easiest way round this problem (don’t laugh) is to wear silk gloves when using floss
Beginners often make the error of having too long a thread coming from the nozzle of the bobbin holder. It should not be longer than a couple of inches at the most. That way it is easy to keep tension on the thread whilst controlling the turns around the hook
To wax or not to wax –that is the question
The answer is that it is a personal choice. Some threads are pre-waxed. This makes them slightly sticky and keeps multi strands together. It grips materials better and is easier to apply to the hook. However, if the wax is too heavy it can build up at the neck of the bobbin holder
The argument against pre-waxed threads is primarily to do with “dubbing”. Dubbing is very fine, fibrous coloured material that is applied to the thread and then wrapped around the hook shank to make the abdomen of the fly. Pre waxed threads may make it easier to make dubbing stick to the thread but may also prevent the fly tier from moving the dubbing along the thread into a better position. Un-waxed threads can always be waxed by applying the CORRECT sort of wax from a block specially made for the purpose
Attaching the Thread to the hook shank
This is usually done just behind the eye, but it could be attached starting at the bend. If the thread is gently waxed first it will attach to the hook shank with just a couple of turns. There should be a reasonable length of spare thread free and this should be held tight at an angle under the hook whilst the thread wraps are applied. The effect of this is to cause each thread wrap to butt up to the next so forming a neat body
To spin or not to spin
If a thread, made from multiple strands but not woven together in manufacture, is attached behind the eye of a hook, and a number of turns applied with the bobbin along the shank and then left to hang free, the twists in the thread will cause the bobbin holder to gently spin until the twist comes out. The thread will then be flat
Flat thread is used to form a smooth under-body to a fly but every time a turn is taken round the hook it introduces a twist into the thread which gradually tightens the thread into a rope and the thread no longer lies flat. It will be necessary to let the bobbin unwind every few turns to prevent this
Conversely it is sometimes advantageous to deliberately spin the bobbin to tighten the thread into a “rope”. North Country Spider patterns are tied in this way and the tight turns gives the body of the fly a segmented appearance
Some threads are already spun into a loose rope and depending on which way they are wound round the hook the turns will either tighten or loosen
This is further complicated by the fact that some people are left handed and some right. Some tie flies with the thread going round the fly in a clockwise direction and some in an anticlockwise direction as seen from the eye and finally some threads are made with a right hand twist and some with a left. The only way to easily determine what to do is to let the bobbin spin and notice which way it unwinds
Pearsall’s silk threads
For many years the firm of Pearsall, established in the eighteenth century, supplied the fly-tyer with silk thread and floss. There are various kinds of Pearsall threads
- Gossamer – suitable for tying trout flies
- Naples – more suited to the larger flies
- Marabou Floss - two stranded floss
Gossamer is available in a variety of colours and is the thread of choice for tying traditional North country spider patterns. The colours are numbered as follows
1. White 2. Straw 3. Primrose 4. Light Yellow 5. Yellow 6. Amber 6a. Orange 6b. Red Spinner
7. Blue 8. Purple 9. Black 9a. Grey 10. Ash 11. Golden Olive 11a. Scarlet 12. Cardinal
13. Crimson 14. Claret 15. Dark Claret 16. Olive 17. Brown 18. Green 19. Hot Orange 20. Light Olive
Of all the spider patterns the best known are Partridge and orange, Snipe and purple and Waterhen Bloa. They are tied with orange, purple and yellow silk respectively. The orange used in the original tying is no longer available so the nearest equivalent, 6a or 19 is used today
Tying Off
When the fly has been completed the last process is to tie the thread off in such a way that it will not come undone. There are three basic ways to do this
- The three turn Half hitch using a half hitch tool
- Three turn Whip finish using a whip finishing tool
- Tying a three-turn whip finish by hand
All three produce identical results but the last two require practice. The easiest technique to learn uses the half hitch tool
When the thread has been tied off it may be cut with scissors or a scalpel, the bobbin is removed and the head of the fly is then very carefully varnished
Varnishing the head of a finished fly
There are simple techniques which improve the finished fly but care is needed when applying varnish. The eye of the hook may become blocked with varnish which makes it impossible to tie on to the tippet. If too much varnish is applied it can soak into the hackles and spoil the finished fly
One can apply the varnish to the thread just before the whip finish stage and then pull the varnished thread tight